HowTo - Clear browser cache
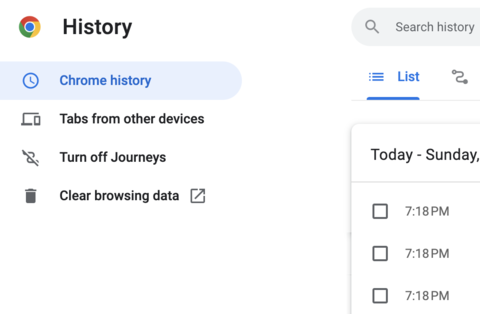
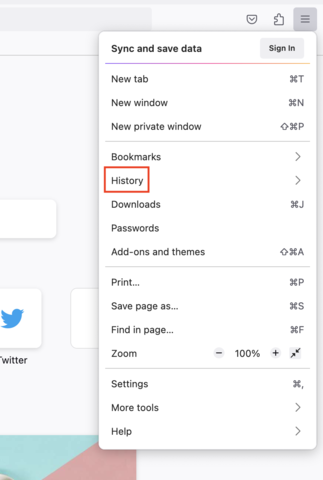
Google Chrome
- Click the Tools menu (three dotted lines in the upper-right corner).
- Select History.
- Select Clear Browsing Data from the left-hand side. Set the Time Range set to All Time. Check-mark Cookies and other site data and Cached images and files and select Clear Data.

- If on a Windows computer, close and re-open Chrome to save your changes. If on an Apple computer, go to the Chrome menu on the top menu bar and select Quit for the changes to take effect.
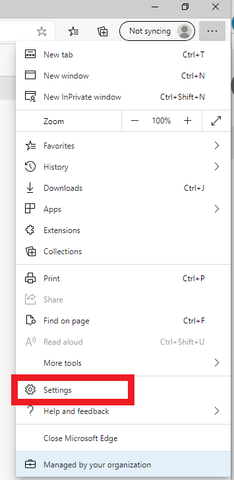
Microsoft Edge
- Click the Tools menu (three dotted lines in the upper-right corner), and open the Settings menu.
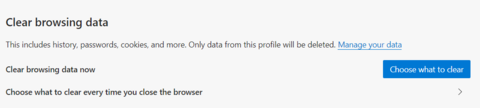
- Click Privacy, search, and services on the left-side menu.
- Under the section Clear browsing data, Click Choose what to clear.
- Select Cookies and other site data and Cached images and files.
- Click Clear Now.
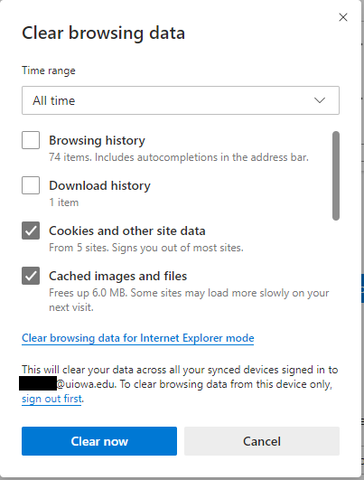
- Close Microsoft Edge completely for your changes to take effect.
Mozilla Firefox
- Click on the Tools bar (three bars in the top-right corner).
- Click History.
3. On the menu to the right, select Clear Recent History.
4. In the Clear All History menu, select the time range to Everything.
5. Select the options, Cookies, Cache, Active Logins, Site settings, and Offline website data.
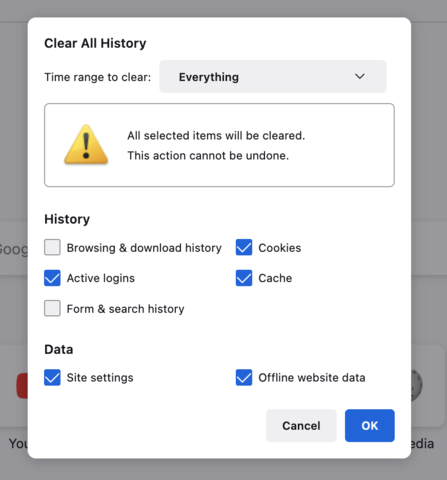
6. Click OK.
7. If on a Windows computer, close and re-open Firefox to save your changes. If on an Apple computer, go to the Firefox menu on the top menu bar and select Quit for the changes to take effect.
Safari for macOS
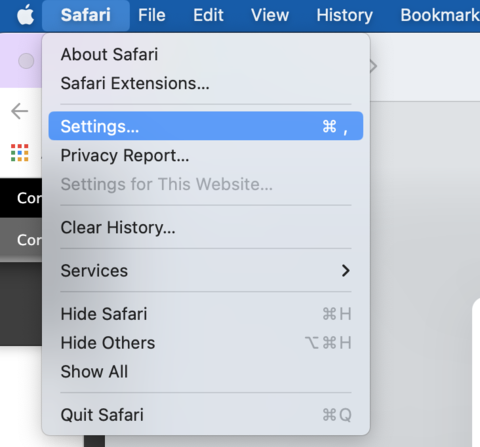
- Click on Safari on the top menu bar.
- Click Settings.
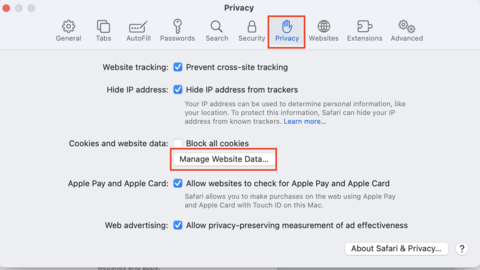
- Click the Privacy tab.
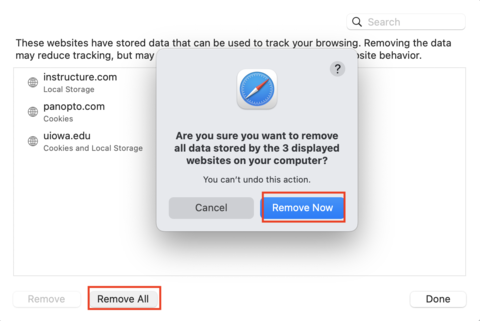
- Click Manage Website Data...
- Click Remove All.
- Click Remove Now.
- Go to the Safari menu on the top menu bar.
- Select Quit to close Safari and save your changes.
Related Articles
HowTo - Share items from OneDrive
This KB article has information regarding sharing from OneDrive: How to share items to others such as individual files, folders, etc. from OneDrive. 1. Open internet browser 2. Sign into Microsoft 365 3. Click app launcher (9-dot cube) in top left ...HowTo - Add signature in Zoho
1. Open internet browser 2. Sign into Zoho 3. Click "Setup" in the top right 4. Type "signature" into search box and click the "Preferences, Personal Settings" result. 5. Click blue "Add signature" button (in the image mine says "View Signature" ...HowTo - Change profile picture on Microsoft account
1. Open internet browser 2. Log into Microsoft 365 3. Click on account picture in top right 4. Click on profile picture circle in popup 5. Click "+ Upload new photo" to upload new picture 6. Adjust as needed 7. Click "Apply" button in lower left ...HowTo - Claim free Adobe license from campus
Adobe licensing is free to staff at the University of Illinois. However, we must manually claim a license. The below steps work for both first time activation and renewal: 1. Open internet browser 2. Go to the Illinois webstore 3. Click 'Shop ...HowTo - Add Microsoft UPN to contact in iMIS
To enable our stakeholders to access our Microsoft Teams sites, their User Principal Name (UPN) is required. Without this, site access is not possible. A stakeholder's UPN can be added by directly editing their record or by sending a welcome message ...